- Table of Contents
- 1. Introduction
- 1.1. Download
- 1.2. Build
- 1.3. Audio driver configuration
- 1.3.1. OSS audio driver
- 1.3.2. Jack audio driver
- 2. GUI
- 2.1. The main toolbar
- 2.2. Song Editor
- 2.3. Pattern Editor
- 2.4. Mixer
- 2.5. LADSPA plugins
- 2.6. Menu
- 2.6.1. Preferences
- 2.6.2. Audio engine info
- 2.6.3. Drumkit manager
- 3. A new song
- 3.1. "Song" mode and "Pattern" mode
- 3.2. A new pattern
- 3.3. A new sequence
- 3.4. Adjust from the mixer
Chapter 1. Introduction
1.1. Download
The latest stable version of hydrogen is available at http://hydrogen.sourceforge.net
It is possible to download the source files directly from CVS snapshots with:
bash$ cvs -z3 -d:pserver:anonymous@cvs.hydrogen.sourceforge.net:/cvsroot/hydrogen co hydrogen
1.2. Build
After having downloaded and decompressed the tar.gz files there's only to:
bash$ cd hydrogen-*
bash$ ./configure
bash$ make
bash$ su -c "make install"
Before compiling, check for additional options with:
bash$ ./configure --help
1.3. Audio driver configuration
It's very important to choose the proper audio driver for our system, since the choice may influence quite much general performances. The choice is between Oss audio driver and Jack audio driver.
1.3.1. OSS audio driver
The Oss audio driver uses /dev/dsp and it's based on the OSS interface which is supported by the vast majority of sound cards available for linux; this said, the use of this audio driver blocks /dev/dsp until Hydrogen is closed i.e. unusable by any other software.
1.3.2. Jack audio driver
The Jack audio driver needs its server running (Jack Audio Connection Kit), a professional audio server which permits very low lag and exchanges with other audio software. We strongly recommend using this driver to have the best out of Hydrogen.
Chapter 2. GUI
2.1. The main toolbar
Before analyzing the two main frames of Hydrogen, let's take a quick look at the main toolbar:

 Start a song or a pattern [Hotkey = Spacebar]
 Stop a song or a pattern [Hotkey = Spacebar]
 Set Pattern Mode.
 Set Song Mode.
 Set speed of playing (range: 40-300 bpm) [Hotkey = Keypad +/-, also mouse wheel up/down works!]
 Shows CPU load.
 Shows MIDI events.
 Click to enable Jack transport: Hydrogen will work as 'slave' with another 'master' program (e.g. Ardour). This applet is only available if Jack Audio Driver is selected.
Other useful keybindings (not customizable for the moment):
[CTRL + O] = Open File
[CTRL + S] = Save File
[Backspace] = Restart song or pattern from the beginning
2.2. Song Editor
The frame "Song Editor" (Fig. 1) shows the song we are creating; each 'X' appearing on this frame means a complete bar as shown in the Pattern Editor, which gathers the different parts of the song (e.g. intro, verse, bridge, chorus and so on). Every bar in the Song Editor must completely identical to be allowed to stay on the same line, therefore even a minor change should slip to a different line (e.g. charleston opened on the forth snare beat). We can add or remove those 'X' only sequencially and once they're created they can only be erased if there's nothing following and moved up or down strictly in the same column (for example if we want to choose another beat between those already created).
The Song Editor comes with 5 buttons:
 Create a new pattern (asks for a name)
 Move selected pattern down
 Move selected pattern up
 Call a menu to modify properties concerning the song (name, author, comments), to
erase the pattern sequence or every pattern created.
 Repeat the whole song
Under these buttons there is a list of patterns created and when they will played (each 'X' = 1 bar). Click on an empty squarebox to submit or cancel the pattern (indicated as an 'X'). Clicking on right mouse button over the name of a pattern will bring up a menu to change name of the pattern, to copy or delete it. Patterns with very same name are not allowed.
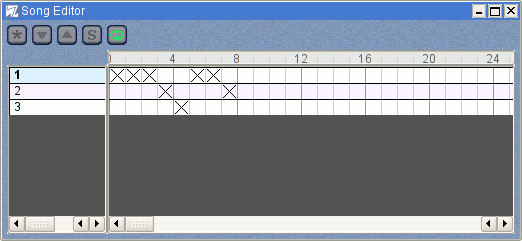
Fig. 1 The Song Editor
2.3. Pattern Editor
The "Pattern Editor" frame (Fig. 2) let us create or modify the pattern (bar) which is being played, add or remove notes and tune intensity. The combobox "Grid Resolution" will modify the resolution so to help adding notes: it's possible to set grid for 4,8, 16, 32, 64 beats per bar and their 'three beats' bars indicated as 4T, 8T, 16T and 32T. You can also set the number of bars actually played by the "pattern size" menu on the right (1 to 8). Selecting an instrument which already has at least one beat on screen will popup a few vertical bars on the lowest part of this frame to allow tuning 'hard' or 'soft' beat. The button
 (hear new notes) will play the sound as it's been added to the pattern.

Fig. 2 The Pattern Editor
Also, you can set new beats clicking on
 which enables direct input by MIDI events or by keyboard according to the following map (key/instrument):
Note that the name of the instrument depends on the drumkit loaded. This list refers to the GMKit loaded by default. The position of the instrument, however, is the same.
Z = Kick
X = Snare Jazz
C = Snare Rock
V = Tom Low
B = Tom Mid
N = Tom Hi
M = Cowbell
Q = Ride Jazz
W = Ride Rock
E = Instrument No. 17 (currently not assigned)
R = Instrument No. 18 (currently not assigned)
T = Instrument No. 20 (currently not assigned)
Y = Instrument No. 22 (currently not assigned)
U = Instrument No. 24 (currently not assigned)
S = Stick
D = Hand Clap
G = Closed HH
H = Pedal HH
J = Open HH
2 = Crash
3 = Crash Jazz
5 = Instrument No. 19 (currently not assigned)
6 = Instrument No. 21 (currently not assigned)
7 = Instrument No. 23 (currently not assigned)
A useful "Quantize" feature is available activating
 . This way the beats inserted will automatically respect the grid resolution currently applied.
Here's a quick reference of the above bindings for you convenience.
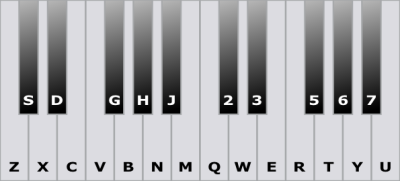
2.4. Mixer
The Mixer frame (Fig. 3) is useful for tuning a global or single volume of the current drumkit. It shows the current peak (click on
 to disable, useful on old CPUs) and the maximum peak allowed (use the knob to change), lets you modify attributes like pan
 , play solo
 , mute
 , load a WAV/AU/AIFF sample for an instrument
 or play only that instrument
 . An instrument currently played blinks the latter. Selecting in the Pattern Editor an instrument causes a green border to appear around that instrument in the Mixer.
Double clicking over the name of an instrument in the Mixer frame will bring up a dialog to modify properties. Switch MIX/FX buttons to modify effects.
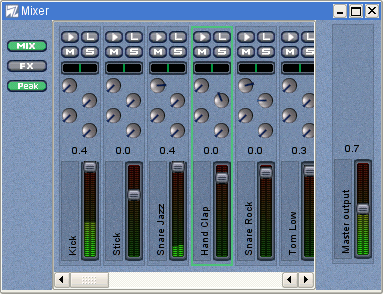
Fig. 3 The Mixer
Those four round knobs for every Mixer line are levels for the LADSPA plugins. See the next section for a detailed overview.
2.5. LADSPA plugins
Hydrogen can also add effects to sounds using any LADSPA plugin library. You need to have installed the LADSPA sources (tarball/rpm/apt available from http://www.ladspa.org) and while this will give a rough idea of how it works you should really have a taste of the real thing installing one or more of these libraries, it's as simple as a "make && make install":
SWH-Plugins available at http://plugin.org.uk. Note that before compiling these plugins you need the FFTW tarball from http://www.fftw.org.
CMT available at http://www.ladspa.org.
TAP available at http://tap-plugins.sf.net.
Once you have installed a few plugins open File -> Preferences -> General and check if the path is correct (installing from sources defaults to /usr/local/lib/ladspa, for example), then open a song you'd like add an effect to and select an instrument that has a few beats in the pattern. In the Mixer click on
 and select one of the four available effect line (Fig. 3a). Click on the Edit Button (
 ), than on "Select the FX": this will bring up another window (Fig. 3b) that let's you choose an effect amongst those installed, they are alphabetically sorted and categorized. Once you're done remember to "Activate" the effect, adjust the level if you want and finally go back to the Mixer: start playing and have fun! Each round knob in the Mixer line controls the level of one effect from top to bottom: the first is Effect 0, the second is Effect 1 and so on. If you want to quickly enable/disable the effect click the
 button.
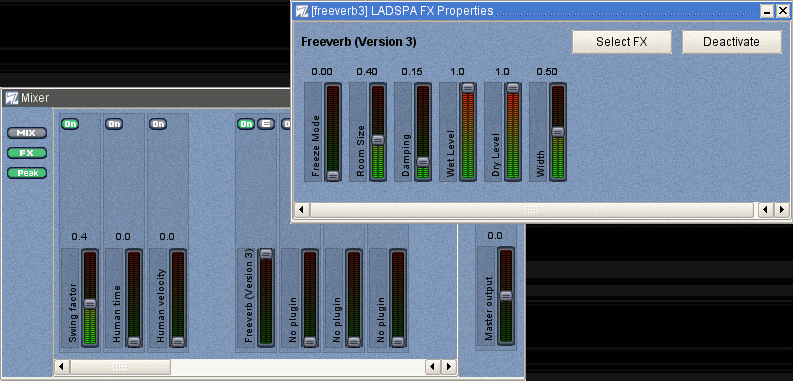
Fig. 3a The LADSPA properties dialog.
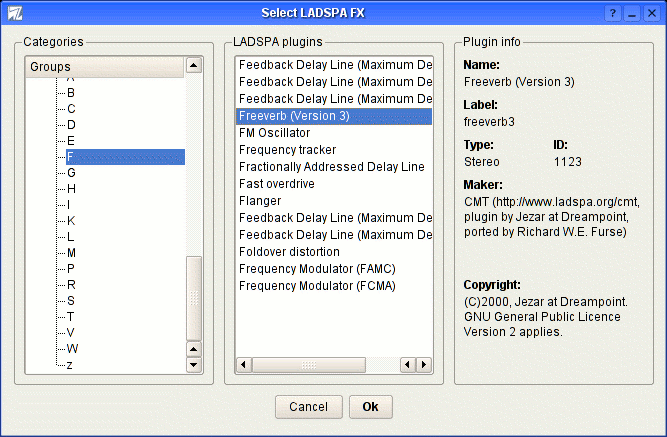
Fig. 3b Select an effect.
2.6. Menu
From the pull-down menus it's worth noticing: File-->'Save as' to save the current song in .h2song format, File-->Export to export it in WAV format, File--> Preferences, Window--> Audio Engine Info and Window--> Drumkit manager.
2.6.1. Preferences
From the "Audio System" tab (Fig. 4) it is possible to modify the audio driver being used (OSS or Jack) with its buffer and sampling rate plus the metronome (on/off) and its volume. We can also set some features of Hydrogen like "Enable track outputs" useful if you want to add effects to a single instrument with jack-rack; "Connect to Default Output Pair" simply connects ALSA output to the default ports: uncheck this if you want to connect jack output to other ports without disconnecting them first. Keep an eye also on the value of "Max Notes": depending on your CPU you may want to change the max simultaneous notes in order to prevent hydrogen from xrun. Clicking on the "Midi System" tab (Fig. 5) will select a menu to enable a MIDI device, a specific channel or all of them, while clicking on "Appearance" tab (Fig. 6) let's you to modify font size, type of frame (Child or Top Level) and speed of mixer's peaks falloff and QT style of the windows.
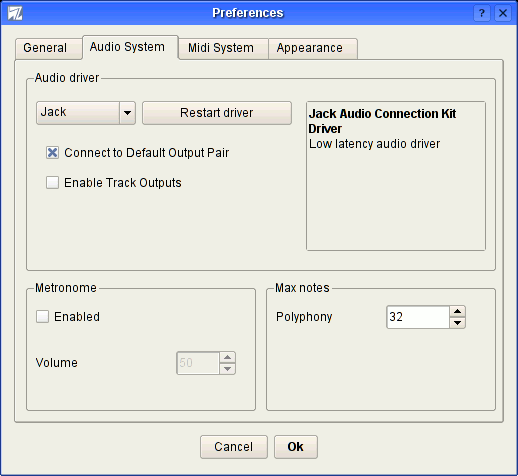
Fig. 4 The Audio System tab
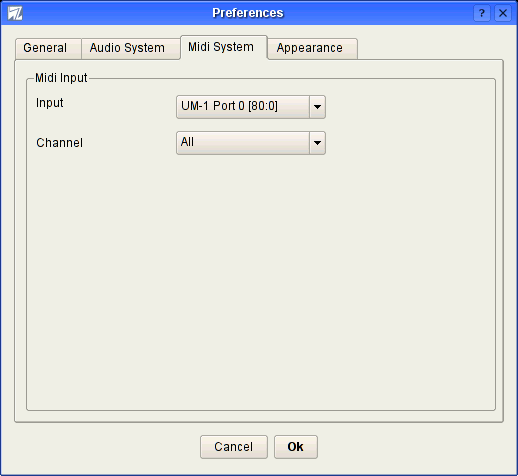
Fig. 5 The MIDI System tab
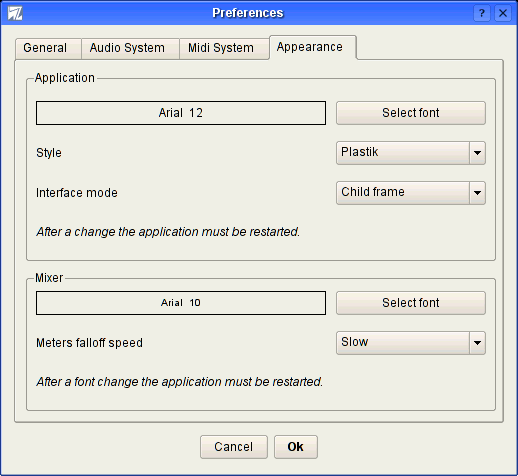
Fig. 6 The Appeareance tab
2.6.2. Audio engine info
This tab (Fig. 7) will bring up a window with general infos about Hydrogen and audio driver. Buffer and sampling rate of Jack audio driver are customizable when the server is started from the shell.
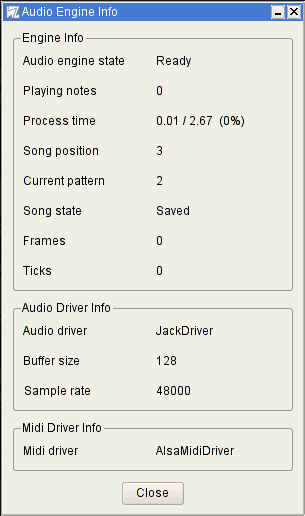
Fig. 7 The Audio Engine Info window. Better check that cpu-meter on old systems and crowded /proc dir ;)
2.6.3. Drumkit manager
The drumkit manager shows all the options concerning drumkits, i.e. groups of sounds (wav) to be binded with every track available so to obtain a proper "groove" according to the situation (disco music, rock, hip hop, etc.). To let you have a rough idea of a good example of use of these drumkits, it is advisable to play the associated .h2song sample song.
From the first screen (Fig. 8) we can load/delete the drumkit, with a short description. Here (Fig. 9) we can save some infos about the current drumkit and from here (Fig. 10) we can import a drumkit (.h2drumkit) (Fig. 11) or export it (Fig. 12).

Fig. 8 Load drumkit. Choose from those installed.

Fig. 9 Save drumkit.

Fig. 10 Import drumkit.

Fig. 11 Export drumkit.
Chapter 3. A new song
3.1. "Song" mode and "Pattern" mode
Hydrogen has 2 main modes: "Pattern" mode (selecting
 ) and "Song" mode (selecting
 ). When "Pattern" mode is activated the current pattern is continously repeated, so
to help changing it until we dont like it, while "Song" mode repeats only once the
current pattern: this is useful when putting together the patterns, to create
the whole structure for the song.
3.2. A new pattern
We'll start from an empty song with an empty pattern, as created by default (Fig. 12): "pattern" mode should be selected now. It is also possible to change name of the pattern.

Fig. 12 There you you go! Hydrogen ready to serve. Note che CPU load and MIDI applet.
Let's click on
 and while the pattern is playing let's add notes in the grid of the Song Editor (Fig. 13) simply left_mouse_clicking on it: adjust grid resolution and BPM speed if needed. Default is 32 for grid resolution and 120 for speed (within a range of 40-300). Click on
 to stop pattern playing. To create new pattern just click on
 and proceed as explained for adding notes, be sure to select the correct pattern before adding notes! Also note that if - for instance - you have selected a grid resolution of 16, you fill the pattern and then switch to a lower resolution (say, 8) you can't delete the the notes outside the grid.

Fig. 13 The Pattern Editor
3.3. A new sequence
Once patterns are created, to copy/paste/delete or move them in the pattern grid (Fig. 14) we can use the buttons in the frame "Song Editor"
 ,
,
 and the copy/delete command that pops up right mouse clicking on the pattern
selected.

Fig. 14 Inserting notes in a pattern
3.4. Adjust from the mixer
Of course we can always use the mixer window, either when creating or playing patterns.
The Mixer frame (Fig. 15) is made of 32 independent tracks, each of these is binded to an
instrument, plus a "Master Output" line to adjust general output volume and a "FX" button to set effects. Every line features 4 buttons (


 ), pan adjust (
 ), current maximum peak, volume fader e name of the track. Clicking on
 will play the selected instrument, cutting the others. The "Mute"
button
 , simply mute that instrument. The maximun peak indicates the maximun volume reached
from the instrument; the peak must be in a range of 0.0 and 1.0, otherwise it will get
distorted producing a weird sound (especially with OSS audio driver), in these cases
it's better to lower volume down.
Finally there is the volume fader to adjust volume of that instrument and check the peak reached thanks to a vu-meter behind the knob.

Fig. 15 Detail of the Mixer